Step 4: Controlling the Tracks
Now that we can control the gun turret in Step 3, let’s enable control of the track parts that move the vehicle body in Step 4.
The Tank Model’s Simplified Tracks
The left and right tracks of the Tank model are modeled as “simplified tracks” (see Writing the Tracks). This applies thrust at the contact points between the track parts and the environment, and while the tread does not actually move around the wheels, it allows for track-like movement. However, since the tread parts do not deform along the terrain, the traversability does not match that of real tracks. For details, see Simplified Simulation of Continuous Tracks.
In the Tank model, the link corresponding to the left track is modeled with the name “TRACK_L”, and the link corresponding to the right track is named “TRACK_R”. These links have axes of the “pseudoContinuousTrack” type corresponding to simplified tracks, and we want to make it possible to control these axes with the gamepad.
Simplified Track Controller
The source code for the “TrackController” controller we’ll create this time is shown below.
 1#include <cnoid/SimpleController>
 2#include <cnoid/Joystick>
 3
 4using namespace cnoid;
 5
 6class TrackController : public SimpleController
 7{
 8    Link* trackL;
 9    Link* trackR;
10    Joystick joystick;
11
12public:
13    virtual bool initialize(SimpleControllerIO* io) override
14    {
15        trackL = io->body()->link("TRACK_L");
16        trackR = io->body()->link("TRACK_R");
17
18        trackL->setActuationMode(Link::JOINT_SURFACE_VELOCITY);
19        trackR->setActuationMode(Link::JOINT_SURFACE_VELOCITY);
20
21        io->enableOutput(trackL);
22        io->enableOutput(trackR);
23
24        return true;
25    }
26
27    virtual bool control() override
28    {
29        static const int axisID[] = { 0, 1 };
30
31        joystick.readCurrentState();
32
33        double pos[2];
34        for(int i=0; i < 2; ++i){
35            pos[i] = joystick.getPosition(axisID[i]);
36            if(fabs(pos[i]) < 0.2){
37                pos[i] = 0.0;
38            }
39        }
40
41        trackL->dq_target() = -2.0 * pos[1] + pos[0];
42        trackR->dq_target() = -2.0 * pos[1] - pos[0];
43
44        return true;
45    }
46};
47
48CNOID_IMPLEMENT_SIMPLE_CONTROLLER_FACTORY(TrackController)
As before, save the above source code with the filename “TrackController.cpp” in the project directory, and add the following to the CMakeLists.txt in the same directory:
choreonoid_add_simple_controller(TankTutorial_TrackController TrackController.cpp)
Then compile it.
Introducing the Controller
Regarding the introduction of the controller, we’d like to say “same as before,” but since the controller we created this time doesn’t have a part that controls the gun turret, if we set only this controller, we won’t be able to move the gun turret. So we want to add this controller while keeping the previous gun turret controllers.
Note
Of course, there’s also the option of including the gun turret control code in this source code itself. In that case, just specify the integrated controller file in the “Controller module” of the SimpleController item, same as before. In this tutorial, to clarify what’s added at each step, we’ve deliberately written only the added parts in each step’s controller. Also, dividing controllers by function in this way leads to improved reusability of the developed controllers.
To add a controller, just add a SimpleController item. Perform the same operation as Generating a Controller Item in Step 2 to generate the item. It’s good to name the generated item to match the controller, such as “TrackController”. For the “Controller module” property of the generated item, specify the controller file “TankTutorial_TrackController.so” created this time.
What requires attention here is the placement of the added controller item. First, similar to the first controller item, it could be placed as follows:
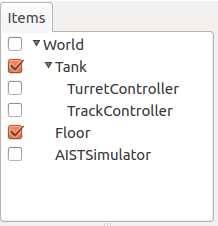
When multiple controller items are placed in parallel as child items of the model to be controlled like this, they control the model as independent controllers. Specifically, the behavior is as follows:
The SimpleControllerIO type objects (IO objects) passed to each controller are different objects. The Body objects for input/output obtained from the IO objects are also different.
The control functions of each controller are executed in parallel. To be precise, when the “Controller threads” property of the simulator item is true, separate threads are assigned for each controller’s control function, and they are executed in parallel.
On the other hand, these two controller items can also be placed as follows:
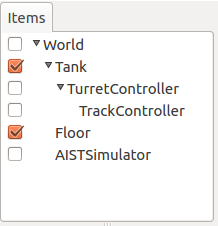
Here, the second controller is placed as a child item of the first controller. In this case, the two controllers operate as one unit. Specifically, the behavior is as follows:
The IO objects passed to each controller are shared as the same object. Therefore, the Body objects for input/output obtained from the IO objects are also shared.
The control functions of each controller are executed in series. The execution order follows depth-first search order in the tree.
The controllers created in this tutorial work correctly in either case, but generally it’s preferable to use the latter integrated format. That requires fewer resources and makes coordination between controllers easier. This tutorial uses this integrated format, so in this step, please place the TrackController as a child item of the TurretController as shown in the second figure.
Note that the former parallel format also has the advantage of being able to execute multiple controllers in parallel. Also, different types of controller items can only be used in this format. Therefore, use both formats appropriately depending on the situation.
Operating the Tracks
Let’s run the simulation. This time you can drive the Tank model’s body with the other (left side) analog stick on the gamepad, so try it out. Push the stick forward to go forward, back to reverse, left to turn left, and right to turn right.
Also, since we’ve kept the TurretController, you can continue to control the gun turret as well.
The correspondence between each part of the gamepad and the operation content shown in the virtual joystick view is as follows:
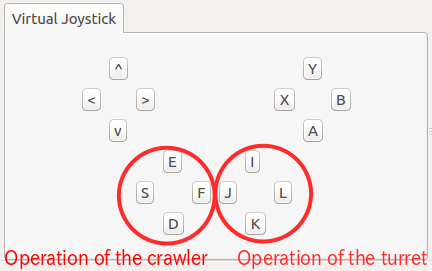
Now you can operate all axes of the Tank model.
Explanation of Implementation Details
Let’s explain the implementation details of TrackController, focusing on the parts specific to this controller.
First, in the initialize function:
trackL = io->body()->link("TRACK_L");
trackR = io->body()->link("TRACK_R");
obtains the input/output links corresponding to the left and right tracks respectively. Next:
trackL->setActuationMode(Link::JOINT_SURFACE_VELOCITY);
trackR->setActuationMode(Link::JOINT_SURFACE_VELOCITY);
specifies JOINT_SURFACE_VELOCITY as the Actuation Mode for each track link. For the Tank model, as shown in Writing the Tracks, the actuation mode is specified in the model file, so this description can be omitted. However, since it may not be specified that way in the model file, it’s preferable to explicitly set the actuation mode like this.
Then:
io->enableOutput(trackL);
io->enableOutput(trackR);
enables output to each track link.
When the actuation mode is JOINT_SURFACE_VELOCITY, the command value to output is given not as torque but as the surface velocity of the track. Also, there’s no particular need for input. Therefore, we use the “enableOutput” function which only enables output. In the case of JOINT_SURFACE_VELOCITY, the surface velocity is output using the link’s state variable dq.
In the control function:
static const int axisID[] = { 0, 1 };
is the setting for the gamepad axis IDs to correspond to the track axes. For this as well, if you’re using a gamepad other than those mentioned in Preparing the Gamepad, you may need to modify the values for appropriate correspondence.
The output is set to the variable dq which stores the joint velocity. In the control function:
trackL->dq_target() = -2.0 * pos[1] + pos[0];
trackR->dq_target() = -2.0 * pos[1] - pos[0];
determines the drive speed of each track from the axis state and outputs it. For the stick’s forward/backward axis, the same drive speed is given to both tracks, and for the stick’s left/right axis, opposite drive speeds are given to both tracks. This results in forward/backward movement with the forward/backward axis and turning with the left/right axis.