Step 2: Creating and Introducing a Controller
In Step 1, there was no controller, so we couldn’t maintain the attitude of the Tank model’s gun barrel during simulation. So in Step 2, we’ll learn the basics of introducing a controller by creating a minimal controller to maintain the attitude.
About Controller Formats
Generally, there can be various implementation formats for controllers. There are formats specified by specific robot systems and simulators, and it’s also common to implement controllers in formats specified by middleware such as ROS.
Regarding this, in this tutorial, we’ll implement controllers in Choreonoid’s original “SimpleController” format. SimpleController implements controllers using the C++ language and Choreonoid’s internal data structures, and has advantages such as requiring less to learn compared to using middleware like ROS, and resulting in relatively simple code.
However, since this is Choreonoid’s original format, it is inferior to middleware like ROS in terms of versatility. It also doesn’t provide communication functions like those offered by middleware such as ROS. Choreonoid has features to cooperate with ROS, so please use those as needed. Methods for using ROS are explained in ROS Integration.
Implementing the “TurretController1” Controller
In the SimpleController format, controllers are implemented as C++ classes. Here we’ll implement “TurretController1” which only maintains the turret’s pitch axis. First, here’s the source code for this controller:
 1#include <cnoid/SimpleController>
 2
 3using namespace cnoid;
 4
 5class TurretController1 : public SimpleController
 6{
 7    Link* joint;
 8    double q_ref;
 9    double q_prev;
10    double dt;
11
12public:
13    virtual bool initialize(SimpleControllerIO* io) override
14    {
15        joint = io->body()->link("TURRET_P");
16        joint->setActuationMode(Link::JOINT_TORQUE);
17        io->enableIO(joint);
18        q_ref = q_prev = joint->q();
19
20        dt = io->timeStep();
21
22        return true;
23    }
24
25    virtual bool control() override
26    {
27        // PD gains
28        static const double P = 200.0;
29        static const double D = 50.0;
30
31        double q = joint->q(); // input
32        double dq = (q - q_prev) / dt;
33        double dq_ref = 0.0;
34        joint->u() = P * (q_ref - q) + D * (dq_ref - dq); // output
35        q_prev = q;
36
37        return true;
38    }
39};
40
41CNOID_IMPLEMENT_SIMPLE_CONTROLLER_FACTORY(TurretController1)
Below, we’ll explain how to introduce this controller into the simulation project and run the simulation. After that, we’ll explain the implementation details of the controller.
How to Build Controllers
There are mainly two methods for building (compiling) controller source code written in C++:
Build together with Choreonoid itself
Build separately from Choreonoid itself
If you’re building Choreonoid from source, method 1 is easier, so we’ll proceed with method 1 in this tutorial.
For details on build methods, please refer to Building Controllers. In actual controller development, you’ll probably use both methods depending on your environment and purpose.
In either case, you first need a directory to store the controller source code. We’ll call this the “project directory”. (We’ll also store other files created in this tutorial in the project directory.)
When building using method 1 above, you need to make Choreonoid’s build system recognize the project directory. There are also two methods for this:
Place the target directory in the “ext” directory within Choreonoid’s source directory
Specify the target directory in “ADDITIONAL_EXT_DIRECTORIES” in Choreonoid’s CMake settings
If adopting A, create the project directory under the ext directory. If adopting B, create the project directory somewhere and then specify the path to that directory in the above configuration item. If there are multiple target directories, you can input them separated by semicolons.
Unless there’s a specific reason, it’s probably best to use method A. We’ll proceed with that method below.
Creating the Project Directory
Let’s create a project directory under ext. The directory name can be anything, but here we’ll use the directory name “tank”. For example, in the Choreonoid source directory:
cd ext
mkdir tank
etc.
In this “tank” directory, create the source code file shown in Implementing the “TurretController1” Controller at the beginning of this step. Let’s name the file “TurretController1.cpp”.
At this point, the project directory and its files have the following structure:
Choreonoid source directory
 + ext
   + tank
     - TurretController1.cpp
Note that it would be good to also save the file from Saving the Project in Step 1 to this “tank” directory. This is also why we call this directory the “project directory” - with the intention of keeping all files related to this tutorial’s simulation project together.
Note
If you don’t know which text editor to use on Ubuntu, try using the standard “gedit” text editor for now. You can launch it by searching for “gedit” in the application search and clicking the “Text Editor” icon. You can also type “gedit” from the command line.
Note
The source code files are stored under “sample/tutorial/Tank/” in the Choreonoid source. If you find it tedious to type them yourself, you can use these files. Other files mentioned in this tutorial are also stored in this directory, so please use them as needed.
Writing CMakeLists.txt
Next, create a new text file called “CMakeLists.txt” in the “tank” project directory, and write the compilation settings for the controller here.
However, the content to write this time is very simple - just add the following line to the newly created “CMakeLists.txt” file:
choreonoid_add_simple_controller(TankTutorial_TurretController1 TurretController1.cpp)
The “choreonoid_add_simple_controller” function used here is a function pre-defined in Choreonoid’s CMake descriptions. You can compile the controller just by giving this function the name of the controller to be generated and the source file.
This time we’ve added the prefix “TankTutorial” to the controller name. This is not required, but we’ve added it to make it easier to distinguish from controllers developed for other projects.
At this point, the project directory and its files have the following structure:
1Choreonoid source directory
2 + ext
3   + tank
4     - CMakeLists.txt
5     - TurretController1.cpp
Building the Controller
Let’s build the controller. Since we’re using the method of building together with Choreonoid itself, just build Choreonoid again. Since CMakeLists.txt has been added this time, first re-run CMake to recognize it. The terminal opened in Step 1 should have Choreonoid’s source directory as the current directory. If not, use
cd [Path to Choreonoid source directory]
to move to Choreonoid’s source directory.
Usually you would have created a “build” directory for building, so move there and re-run CMake.
cd build
cmake ..
Next, continue in the build directory with
make
Please enter this. (For details on the build method, see Building Choreonoid in Building and Installing from Source Code (Ubuntu Linux).)
At this time, if conditions A or B mentioned in How to Build Controllers are met, the above CMakeLists.txt will be detected and its contents will be executed.
If the build succeeds, a file called:
TankTutorial_TurretController1.so
should be generated in the build directory’s “lib/choreonoid-x.x/simplecontroller” (x.x is Choreonoid’s version number).
This is the controller itself. As you can see from the extension, the controller is actually a shared library file. From now on, we’ll refer to the directory where the controller was generated as the “controller directory”.
If you get a compilation error, refer to the error message and review your source code and CMakeLists.txt descriptions.
Note
If you execute “make install” after this, the generated controller file “TankTutorial_TurretController1.so” will also be copied to the installation destination. However, in this tutorial, as mentioned in Launching Choreonoid in Step 1, we’re explaining under the assumption of executing files in the build directory without executing “make install”, so please be aware of this.
Introducing the Controller
Let’s introduce the built controller into the simulation project.
Generating a Controller Item
SimpleController is designed to be introduced into projects through “SimpleController Items”, so first let’s generate the corresponding item. Select “SimpleController” from “File” - “New” in the main menu to generate it. The item name can be anything, but it would be good to name it “TurretController” to match the controller.
Place the generated item as a child item of the Tank item to be controlled, as shown in the figure below.
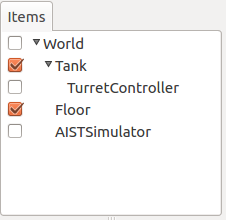
This placement specifies that the controller’s control target is the Tank model. To achieve this, you can either select the Tank item before generating the controller item, or drag it to this position after generation.
Setting the Controller Module
Next, set the controller module we created earlier to the SimpleController item.
This is done using the “Controller module” property of the SimpleController item. First, select “TurretController” in the item tree. Then the property list for this item will be displayed in the item property view, so look for the “Controller module” property among them. Double-clicking on the value part of that property (which is blank by default) allows you to input the module file.
At this time, it’s convenient to use the file dialog for input. When inputting the controller module, there’s an icon at the right edge of the value input area as shown in the figure below.

Clicking this icon displays a file selection dialog. This dialog usually points to the standard directory for storing SimpleControllers. The “TankTutorial_TurretController1.so” we created earlier should be stored there, so select it.
Now the controller module is set to the SimpleController item. With this, we can make the controller function.
Once you’ve configured up to this point, save the project again. It would be good to save it with the filename “step2.cnoid” in the project directory.
Running the Simulation
After performing the above settings, run the simulation. The gun barrel that pointed downward due to gravity in Step 1 should now remain facing forward. This is because the “TurretController1” controller is applying the torque necessary to maintain the attitude to the turret pitch axis.
If it doesn’t work well, also check the message view. If there are problems with the controller settings or operation, messages to that effect may be output when starting the simulation.
Note that this controller doesn’t control the turret yaw axis, so no force is applied there. Similar to Step 1, if you drag the turret part using Interaction Functions, you can see that it moves freely with respect to the yaw axis.
Explanation of Implementation Details
The implementation details of the “TurretController1” controller we created are as follows.
SimpleController Class
First, SimpleController is designed to be implemented as a class that inherits from the “SimpleController” class defined in Choreonoid. So first,
#include <cnoid/SimpleController>
includes the header where this class is defined. Header files provided by Choreonoid are stored in the “cnoid” subdirectory of the include directory, and are written as paths from the cnoid directory like this. No extension is needed.
Also, all classes defined in Choreonoid belong to a namespace called “cnoid”. Here,
using namespace cnoid;
allows us to omit the namespace.
The controller class definition is done by:
class TurretController1 : public SimpleController
{
    ...
};
You can see that TurretController1 is defined by inheriting from SimpleController.
Several functions are defined as virtual functions in the SimpleController class, and you implement the controller’s processing by overriding these functions in the inherited class. Usually you override the following two functions:
virtual bool initialize(SimpleControllerIO* io)
virtual bool control()
Implementing the initialize Function
The initialize function is a function that initializes the controller and is executed only once just before the simulation starts.
The SimpleControllerIO type given as an argument to this function is a class that consolidates the functions necessary for controller input/output. For details, see IO Object in Controller Implementation. Here, first
joint = io->body()->link("TURRET_P");
obtains the Link object for input/output of the turret pitch axis and stores it in the joint variable.
io->body() obtains the Body object for Tank model input/output, and then obtains the one with the name “TURRET_P” from the Link objects that this object has. This corresponds to the joint of the turret pitch axis section described in Creating the Tank Model.
Next,
joint->setActuationMode(Link::JOINT_TORQUE);
sets the Actuation Mode of this joint to joint torque. This enables control using joint torque as the command value.
Also,
io->enableIO(joint);
enables input/output for this joint. This description enables the default input/output for the joint. Since the actuation mode is now joint torque, it will input joint angle and output joint torque. This makes it possible to perform PD control on this joint.
Please note that if you don’t set the above actuation mode or enable input/output for a joint, you cannot control that joint. Other functions available for setting input/output include enableInput which sets only input, and enableOutput which sets only output.
Note
Functions that do similar things include SimpleControllerIO’s setLinkInput, setJointInput, setLinkOutput, and setJointOutput, but these are old specification functions kept for compatibility, so please use the enableXXX functions from now on.
Other values necessary for PD control include:
q_ref = q_prev = joint->q();
which obtains the initial joint angle and assigns it to variables q_ref and q_prev. q_ref is the target joint angle, and q_prev is a variable for calculating joint angular velocity. Also,
dt = io->timeStep();
assigns the time step to variable dt. This represents the internal time to advance per physics calculation of the simulation, and the next control function will be called at this time interval.
Finally, it returns true as the return value of the initialize function to inform the system that initialization was successful.
Implementing the control Function
The control function is the part where the actual control code is written, and is executed repeatedly during simulation.
Here, only PD control code for the turret pitch axis is written.
static const double P = 200.0;
static const double D = 50.0;
are the P gain and D gain values, and
double q = joint->q(); // input
inputs the current joint angle,
double dq = (q - q_prev) / dt;
calculates the current angular velocity,
double dq_ref = 0.0;
sets the target angular velocity to 0,
joint->u() = P * (q_ref - q) + D * (dq_ref - dq); // output
outputs the torque value calculated by PD control to the joint, and
q_prev = q;
updates q_prev for the next calculation.
In this way, the key point is that input/output is performed using Link object variables. joint->q() and joint->u() correspond to joint angle and joint torque variables, respectively.
Finally, it returns true as the return value to indicate normal termination. This continues the control loop.
Defining the Factory Function
Once you’ve defined the SimpleController class, you also need to define a “factory function” that generates that object in the prescribed format. This is necessary for the SimpleController item to load the controller’s shared library at runtime and generate the controller object from it.
This can be written using a macro as:
CNOID_IMPLEMENT_SIMPLE_CONTROLLER_FACTORY(TurretController1)
Please provide the controller class name as an argument like this.