Step 5: Controlling the Light
The Tank model is equipped with a light (light source). In Step 5, we’ll make it possible to operate this light from the controller and learn about how to control devices.
Environment Setup
To make the effects of using the light more clear, let’s set up the environment.
Checking the Graphics Environment
To ensure that the light effects are rendered correctly, Graphics Environment Setup needs to be done properly. When using Ubuntu Linux, please also check Installing GPU Drivers on Ubuntu Linux.
Changing the Environment Model
With just the floor model we’ve been using, there isn’t much visible difference when the light is illuminated. So let’s change the environment model. This time we’ll use a model called “Labo1” that’s prepared as a Choreonoid sample. This is a model assuming a research plant, as shown below.

This model is stored in Choreonoid’s share directory under “model/Labo1” with the filename “Labo1.body”. Please add it to the project we’ve been creating and load this model.
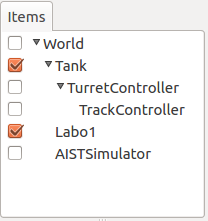
The placement of the loaded item in the Item Tree View should be as a child item of the World item, similar to other models. If the item isn’t checked, check it to display the model. The position of the model in the scene can remain at the default. Then, let’s delete the “Floor” item, which is the floor model we’ve been loading. Right-clicking on the item displays a context menu, from which you can select “Cut” to delete it. After performing these operations, the item tree should look like this:
As long as the parent-child relationships between items are the same, the order of items doesn’t matter. So for example, it’s fine if Labo1 is placed after AISTSimulator. If you’re concerned about the order, you can drag items to change just the order, so set it up as you like.
Changing Scene Settings
Next, let’s change settings related to scene rendering. To do this, first press the “Settings button” on the scene bar below.

This displays a settings dialog like the one below, where you can configure various settings related to scene rendering.

First, uncheck “Show floor grid lines” to hide the grid lines.
Next, let’s configure the lighting. First, is “Additional lights” turned on? If this is on, the light mounted on the Tank model will also be enabled.
Then, try turning off “Headlight” and “World light”. You should see a scene like the figure below, where only the Tank model’s light illuminates the surroundings in darkness.
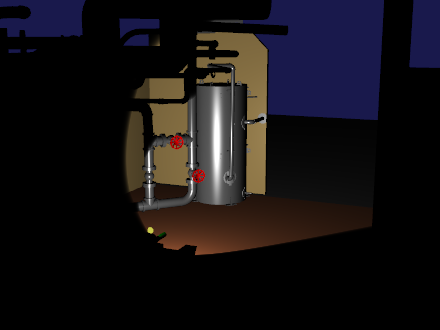
Now the light effect is clearly visible. (When using the default renderer, the light illumination appears somewhat more diffuse.)
If you have enabled the GLSL renderer, you can also display shadows. This is set with the “Shadow 1” and “Shadow 2” checkboxes in the settings dialog. Enter the target light number in “Light” for each. The numbers correspond to 1 for the light mounted on the Tank model and 2 for the ceiling light in the Labo1 model, so try enabling each and see how the display changes.
An example of a scene with shadows from the Tank model and Labo1 model lights enabled is shown in the figure below.
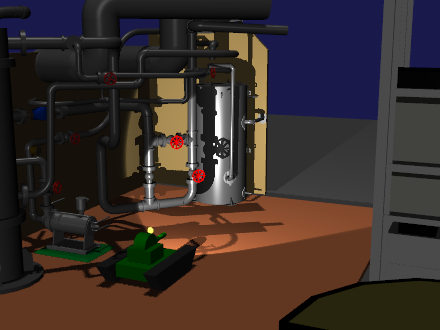
Now the scene has an appropriate atmosphere. Let’s save the settings up to this point as a project file with a name like “step5.cnoid”.
Note
Shadows may not be rendered depending on the GPU or GPU driver you’re using. For details, see Graphics Environment Setup.
Light Controller
The environment setup has taken a while, but let’s get to the main topic. What we’ll create this time is a controller to operate the Tank model’s light, which we’ll call “LightController”. The source code for this controller is shown below.
 1#include <cnoid/SimpleController>
 2#include <cnoid/SpotLight>
 3#include <cnoid/Joystick>
 4
 5using namespace cnoid;
 6
 7class LightController : public SimpleController
 8{
 9    SpotLight* light;
10    Joystick joystick;
11    bool prevButtonState;
12
13public:
14    virtual bool initialize(SimpleControllerIO* io) override
15    {
16        light = io->body()->findDevice<SpotLight>("Light");
17        prevButtonState = false;
18        return true;
19    }
20
21    virtual bool control() override
22    {
23        static const int buttonID[] = { 0, 2, 3 };
24
25        joystick.readCurrentState();
26
27        bool changed = false;
28
29        bool currentState = joystick.getButtonState(buttonID[0]);
30        if(currentState && !prevButtonState){
31            light->on(!light->on());
32            changed = true;
33        }
34        prevButtonState = currentState;
35
36        if(joystick.getButtonState(buttonID[1])){
37            light->setBeamWidth(std::max(0.1f, light->beamWidth() - 0.001f));
38            changed = true;
39        } else if(joystick.getButtonState(buttonID[2])){
40            light->setBeamWidth(std::min(0.7854f, light->beamWidth() + 0.001f));
41            changed = true;
42        }
43
44        if(changed){
45            light->notifyStateChange();
46        }
47
48        return true;
49    }
50};
51
52CNOID_IMPLEMENT_SIMPLE_CONTROLLER_FACTORY(LightController)
As before, save the above source code with the filename “LightController.cpp” in the project directory.
Add to CMakeLists.txt:
choreonoid_add_simple_controller(TankTutorial_LightController LightController.cpp)
and compile it.
Introducing the Controller
Similar to the TrackController introduced in Step 4, generate a corresponding SimpleController item for the LightController and place it as a child item of the TurretController. After doing this, the Item Tree View will look like this:

By placing them this way, the control functions of TurretController, TrackController, and LightController will be called in sequence, and they will function as one unit.
Operating the Light
Run the simulation and confirm that you can now operate the light.
Light operation is assigned to the A, X, and Y buttons on the gamepad or virtual joystick view (on PlayStation gamepads, these are the ×, □, and △ buttons).
First, the A button toggles the light on and off.
Also, the X and Y buttons change the light’s illumination range. Pressing the X button narrows the illumination range, and pressing the Y button widens it.
The track and turret operations we’ve implemented so far are still available, so try illuminating various parts of Labo1 with the light while moving the Tank model.
Note that if the simulator item’s property “Record device states” is set to true, light operations will also be recorded as simulation results and reproduced during Playing Back Simulation Results. This property is true by default. To confirm this feature, after operating the light in various ways, stop the simulation and play it back.
Explanation of Implementation Details
In Choreonoid, lights are defined as one type of “device”. The key point of this step is to learn how to output from the controller to devices.
First, in the initialize function:
light = io->body()->findDevice<SpotLight>("Light");
obtains a device object of SpotLight type with the name “Light” from the Body object for input/output, and stores it in the light variable. This object is used for input/output with devices as well. For the definition of the Tank model’s Light, see Writing the Spotlight in Creating the Tank Model.
In the control function:
static const int buttonID[] = { 0, 2, 3 };
sets the button IDs to use for light operation. These IDs normally correspond to the A, X, and Y buttons. If the button mapping doesn’t work well, adjust these values.
The state of the A button is obtained with:
bool currentState = joystick.getButtonState(buttonID[0]);
In this way, you can obtain the button state using the getButtonState function. Then:
if(currentState && !prevButtonState){
    light->on(!light->on());
    changed = true;
}
toggles the on/off state of the light object using the SpotLight device’s on function when the button is pressed.
Note that just changing the state of the input/output device object doesn’t mean the content has been output. To do this, you need to execute a function called “notifyStateChange” on the device object. This allows the state change to be detected by the simulator itself and actually reflected in the simulation.
However, this function only needs to be executed once (per control function call), even when changing multiple device parameters. For this reason, this implementation first uses a bool variable called “changed” as a flag for whether there was a state change, and at the end:
if(changed){
    light->notifyStateChange();
}
executes it once collectively.
The operation to change the light’s illumination range is similar. For the operation to expand the illumination range:
if(joystick.getButtonState(buttonID[1])){
    light->setBeamWidth(std::max(0.1f, light->beamWidth() - 0.001f));
    changed = true;
determines the state of the X button, and if the button is pressed, uses SpotLight’s setBeamWidth function to decrease the illumination angle value. The Y button operation is similar.
For more detailed information about handling devices, please refer to the sections from Input/Output for Devices onward in Controller Implementation.