Introducing Controllers
Introducing Controllers
To control robots in simulation, you need to introduce controllers to your simulation project. The basic flow of introduction is as follows:
Select the controller item type to use
Prepare a controller body compatible with the controller item type
Create a controller item and place it as a child item of the body item
Set the controller body to the controller item
These steps are explained below through specific examples.
Preparing the Simulation Project
First, following the procedure explained in Creating a Simulation Project, create a project with all elements except controllers prepared.
This time, we’ll prepare a model that can be controlled by a controller. Among the Sample Models, there is a robot model called “SR1”, so let’s use it. Load “model/SR1/SR1.body” from the share directory.
Additionally, incorporate a floor model, simulator item, and a world item to organize them, creating the following project structure:
[ ] - World
[/]   + SR1
[/]   + Floor
[ ]   + AISTSimulator
The robot model should be displayed in the scene view as follows:

The SR1 model is a multi-link model with 29 joints, capable of taking various poses by moving its joints. By default, it’s in an upright pose as shown in the figure, but you can also start simulation from other poses as the initial state. See Basics of Robot/Environment Models - Changing the Position and Posture and Handling Legged Models for how to edit poses.
Don’t forget to set the Setting Time Resolution. For now, let’s set the time step to 0.001 (1 millisecond).
Without a Controller
To clarify the effect of controllers, let’s first run a simulation without any controller. What happens to the robot when the simulation starts?
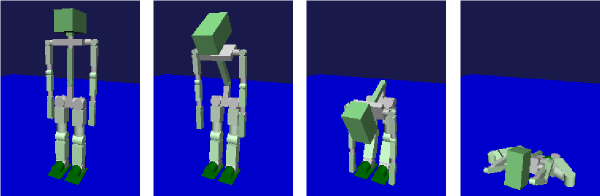
As shown in the figure, the robot immediately collapses to the floor after the simulation starts.
Without a controller, no commands are sent to the joints, so no joint torque is generated, leaving the robot in a powerless state. Meanwhile, since gravity is applied by default, each link of the robot falls to the floor following gravity.
Thus, without a controller, the robot cannot even stand. This shows that controllers are essential for robots. To make them walk or perform tasks, appropriate controllers are necessary.
Selecting Controller Item Type
In Choreonoid, controllers are introduced through “controller items”. A controller item is an abstract item type that defines the foundation for input/output, and in practice, you use item types that inherit from it. Generally, the controller body is implemented separately from the controller item, so you need to prepare that as well.
This mechanism allows controller bodies to take any implementation format. In reality, there are various formats for robot controllers. Some are unique to specific robots, while others are created according to specifications of robot middleware like ROS or OpenRTM. Controller items function as intermediaries between these implementation formats and virtual robots in Choreonoid. By using a controller item that corresponds to the desired controller body format, you can introduce the controller body.
This requires having controller items available that support the controller format you want to use. Currently available controller item types in Choreonoid include:
Simple Controller Item
A controller item that supports the “Simple Controller” format, which is Choreonoid’s proprietary controller implementation format. It’s included in the Choreonoid main body. This format is designed with emphasis on simplicity of controller implementation. While it doesn’t include features like network communication with other modules, it’s suitable for efficiently implementing less complex controllers.
BodyROS Item / BodyROS2 Item
Controller items that enable integration with ROS / ROS 2, robot middleware. They’re included in the choreonoid_ros / choreonoid_ros2 packages, respectively. Using these allows you to retrieve sensor data from virtual robots.
To use controllers in formats not supported by existing controller items, you need to develop a new Choreonoid plugin that provides the appropriate controller item.
Note
As a method of introducing controllers, you can also implement the controller body directly as a controller item inheritance type. This method allows direct use of native APIs for accessing virtual robots, maximizing controller flexibility and efficiency. However, such controllers can only be used in Choreonoid and require the effort of implementing them as plugins, so this method is not common.
Preparing the Controller Body
Prepare a controller body in a format compatible with the selected controller item type. You can use existing controllers or develop new ones as needed.
For this example, we’ll use a Simple Controller Item. In this case, we prepare a controller body implemented in the Simple Controller format. In the Simple Controller format, you implement control code by defining a class that inherits from the “SimpleController” class in C++ and overriding several virtual functions. The controller body is the compiled result as a shared library (.so) or dynamic link library (.DLL) file. See Controller Implementation for implementation details.
Choreonoid includes several Simple Controller samples, and we’ll use one of them here. Samples are generated when the CMake option BUILD_SIMPLE_CONTROLLER_SAMPLES is ON during Choreonoid build. This option is ON by default, but if it’s not, turn it ON and build Choreonoid to make the Simple Controller samples available.
Creating a Controller Item
Select the controller item type to use from the main menu’s “File” - “New” and create it. Place the created item as a child item of the body item to be controlled. You can either select the body item beforehand and then create the controller item, or create it first and then drag it to this position. This arrangement is necessary for the system to identify the controller item’s control target.
In this example, select “Simple Controller” from the “New” menu to create a Simple Controller Item, and arrange it under the SR1 item as shown below:
[ ] - World
[/]   + SR1
[ ]     + SimpleController
[/]   + Floor
[ ]   + AISTSimulator
Setting the Controller Body
Set the controller body to the controller item.
For Simple Controller Items, this is done by setting the controller body’s filename in the “Controller module” property.
When setting this property, you can also use a file selection dialog box. When editing the property value, a dialog box icon appears to the right of the value. Click this icon to open the dialog box and select the controller file.
By default, it opens the standard directory for storing Simple Controllers. The standard directory is the “simplecontroller” directory under the “plugin directory” introduced in Directory Structure. Simple Controller samples are also stored in this directory.
As an example, let’s set “SR1MinimumController”, a Simple Controller sample for the SR1 model. This is a very simple controller that only maintains the robot’s current posture. The file is “SR1MinimumController.so” (or “SR1MinimumController.dll” on Windows) stored in the standard directory, so select this file from the dialog. The property value should then be set to “SR1MinimumController”. If it’s in this state, you’re good to go.
Note that you can also set the controller module by directly entering the filename without using the file selection dialog box.
Note
When setting the controller module, file extensions can be omitted. In that case, the appropriate extension for the running OS is automatically added internally. This allows settings to be valid on any OS. When selecting from the file selection dialog, the extension is omitted as shown above.
Note
The actual file is stored in the directory specified by the Simple Controller Item’s “Base directory” property. You can specify either “Controller directory” or “Project directory” as properties. The default is “Controller directory”, which loads files from the Simple Controller’s standard directory. With “Project directory”, files are loaded from the directory containing the currently loaded project file. When specifying the filename with a full path, the base directory becomes “None”.
Running the Simulation
Run the simulation with the above settings completed. If the settings are successful, this time the robot should maintain its posture without collapsing. This is because the PD control code written in “SR1MinimumController” outputs torque commands to each joint to maintain the posture.
If it doesn’t work, check the message view as well. If there are problems with the controller settings or operation, messages informing you of this may be output when the simulation starts.
Note
For body items with only one controller configured, the Output Destination of Simulation Results becomes a child item of the controller item rather than the body item. This is to make the item tree easier to read, and result playback operations don’t particularly change compared to cases without controllers.
Other controller samples are also available. Refer to Sample Projects and try other samples. For samples targeting the SR1 model, there are projects like “SR1Walk.cnoid” that makes it walk, and “SR1Liftup.cnoid” that lifts a box, allowing you to see how robot behavior changes with different controllers.