Simulation Samples
This section introduces the simulation samples for WRS2018.
Overview
Each WRS2018 task is executed as a simulation combining the following elements:
Environment model
Robot model
Robot control software
Robot operation interface
Simulation settings
For the environment models, corresponding models are prepared for tasks T1 through T6. By adding robots to these and configuring the simulation, you can simulate the tasks.
The robot aspect varies by competition team. Some teams may use the standard robot models as-is, while others may modify them or use their own models. Additionally, robots cannot move with just a model alone. Elements such as control software to move the robot and operation interfaces for remote control are also necessary. These are crucial elements that greatly influence competition results, and each team will likely build their own unique systems.
For these reasons, the actual simulations executed in the competition will differ for each team, and we cannot bundle and provide identical simulations with Choreonoid in advance.
Instead, we have prepared simulation samples, which we’ll introduce here. By running and trying these samples, you should be able to understand what the actual competition is like.
However, the samples themselves provide only minimal robot control software and operation interfaces. It would be difficult to achieve high scores using only these, and many tasks would be difficult to complete at all. The samples introduced here are merely for grasping the task concepts, and please understand that actual competition will require much more sophisticated control software and operation interfaces than what’s included here. Competing in the development of such aspects is also one of the purposes of this competition.
Project Configuration and Loading
The Projects for the simulation samples are stored in the “sample/WRS2018” directory of the Choreonoid source.
To use these, please turn BUILD_WRS2018 ON when building Choreonoid. This will perform the following:
Build the controllers necessary for task simulations. These controllers don’t control robots but control the behavior of task environment models. For example, in task T5, when you connect a nozzle to a hose, open the valve, and pull the nozzle lever, water sprays from the nozzle—this behavior is realized through control by a controller called “HoseNozzleController.”
Create symbolic links to the directory containing WRS2018 samples in the share directory within the build directory. This enables running WRS2018 samples from Choreonoid in the build directory. (If building in the source directory, the share directory is the source’s share directory. If using a separate build directory, it becomes the build directory’s share/choreonoid-x.x directory.)
During installation, create a WRS2018 directory in the installation destination’s share directory (installation destination/share/choreonoid-x.x) and install samples there. This enables running WRS2018 samples from the installed Choreonoid.
Projects are divided into several files and loaded by combining them with Python scripts. This is because, in addition to the six tasks, we’ve prepared multiple robot models and simulation settings, and creating project files for all combinations would require an enormous number of project files with duplicate content. In that case, when modifying any one element, the same part would need to be modified in numerous project files, making management difficult.
The elements constituting projects include the following, stored under “WRS2018/project”:
Task environment models
Task T1:
T1L.cnoid (for large robots)
T1M.cnoid (for medium robots)
Task T2: T2.cnoid
Task T3: T3.cnoid
Task T4: T4.cnoid
Task T5: T5.cnoid
Task T6: T6.cnoid
Note
In the actual competition, task difficulty increased as teams progressed from preliminaries to semifinals and finals. The above are preliminary models, with semifinal and final models stored with “-2” and “-3” suffixes respectively.
Robot models and related settings
AizuSpiderSS (single-arm simplified track version): AizuSpiderSS.cnoid
AizuSpiderSA (single-arm AGX track version): AizuSpiderSA.cnoid
DoubleArmV7S (simplified track version): DoubleArmV7S.cnoid
DoubleArmV7A (AGX track version): DoubleArmV7A.cnoid
WAREC-1: WAREC1.cnoid
Quadcopter: Quadcopter.cnoid
Simulation settings
AIST physics engine (AGX Dynamics not required): AISTSimulator.cnoid
AGX Dynamics: AGXSimulator.cnoid
Screen (view) settings
For standalone execution (multiple scene views): MultiSceneViews.cnoid
For remote operation execution (single scene view): SingleSceneView.cnoid
We’ve prepared Python scripts with the following filename format as scripts to build projects combining these elements. They are stored under “WRS2018/script”:
Task-RobotModel.py
For example, the project for using the simplified track version AizuSpider robot in task T1 has the filename:
T1M-AizuSpiderSS.py
Python scripts corresponding to projects can be specified as command-line arguments when starting Choreonoid, just like project files.
For example, if you built Choreonoid following Setting Up the Simulation Environment / Installing Choreonoid, you can load the above project by entering in the source directory:
bin/choreonoid sample/WRS2018/script/T1M-AizuSpiderSS.py
If you’ve installed Choreonoid under /usr/local and are using the installed Choreonoid:
choreonoid /usr/local/share/choreonoid-1.6/WRS2018/script/T1M-AizuSpiderSS.py
or
cd /usr/local/share/choreonoid-1.6
choreonoid WRS2018/script/T1M-AizuSpiderSS.py
Note that scripts are prepared for preliminary models. For semifinal or final models, you can modify the arguments of “WRSUtil.loadProject” in each script. For example, T1M-AizuSpiderSS.py contains:
import WRSUtil
WRSUtil.loadProject(
    "MultiSceneViews", "T1M", "AISTSimulator", "AizuSpiderSS")
By changing “T1M” to “T1M-2” here, it will load the semifinal model.
Each script is actually generated by “generate-sample-projects.py” stored under “WRS2018/script”, so you can also modify and execute that.
Running Task T1
Let’s first try the sample for T1 (Obstacle Traversal), the first task. There are several variations, which we’ll explain in order below. We’ll also explain content common to other tasks here.
Running the AizuSpiderSS Version
First, let’s try a sample that can run without an AGX Dynamics license. Start Choreonoid as follows and load the sample for the AizuSpiderSS model. (We’ll assume using Choreonoid built in the source directory below.)
bin/choreonoid sample/WRS2018/script/T1M-AizuSpiderSS.py
You should see a screen like this:
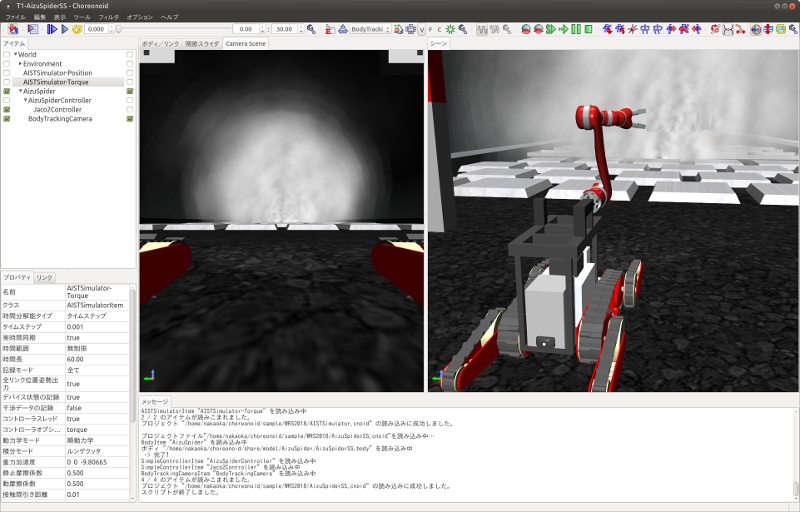
Now Starting a Simulation. You can then operate the displayed Aizu Spider robot with a gamepad. For operation methods, see Aizu Spider Operation Method.
Skillfully operate the robot to traverse the rough terrain, avoid obstacles, and proceed deeper into the tunnel. In this task, after passing through the starting gate, the task is completed when you pass through the goal gate at the end of the tunnel.
The center of the screen displays the camera image mounted on the robot. This sample is configured for remote robot operation while viewing this camera image. On the right side of the screen is a view from diagonally behind the robot. However, this is not from a camera mounted on the robot, so it cannot be used for remote operation. In the competition, such views are displayed only on the simulation PC and used for audience presentation and referee judgment.
The robot model “AizuSpiderSS” used here has simplified tracks. This can be simulated with Choreonoid’s standard Simulator Item “AIST Simulator,” and this sample is configured accordingly. However, as you’ll notice when operating it, the belt-like parts of the tracks don’t rotate; the robot proceeds forcibly without the tracks moving. This applies Simplified Simulation of Continuous Tracks. In this case, the track behavior isn’t very close to the actual machine, and operation may become unstable depending on environmental contact conditions, but please understand this is a limitation of this simulation method. One reason for using AGX Dynamics in this competition is to overcome this limitation.
In samples using AIST Simulator, two settings are prepared for testing. One is the “AISTSimulator-Torque” simulator item, where command values are torque values. We’ve also prepared “AISTSimulator-Position” simulator item, where robot joint command values are position (joint angle) commands. The control software description method and simulation behavior differ slightly between these. We won’t detail this here, but since AIST Simulator isn’t used in the competition, you needn’t worry much about it. However, note that you need to select one of these items when running the simulation. Torque is selected by default.
About Scene Effects
In the T1 sample, as shown in the figure above, smoke is generated in various places within the tunnel. This can impair robot visibility, so the competition requires strategies to ensure robots can reliably progress through tasks even in such conditions.
This smoke is called a scene effect and is enabled if BUILD_SCENE_EFFECTS_PLUGIN is turned ON in Installing Choreonoid and Graphics Environment Setup is also configured. If smoke doesn’t appear, there’s an issue with these settings, so please check again. Scene effects also include flames and water flow, used in other tasks. Therefore, to fully reproduce the competition, the scene effects feature must be enabled.
However, enabling scene effects increases PC load. If your simulation PC’s specifications aren’t equivalent to those presented in Simulator Used, simulation may slow down or display may not be smooth. If this significantly hinders preparation for participation, please disable the scene effects feature.
Note
The scene effects feature is realized by the SceneEffects plugin. This isn’t built unless BUILD_SCENE_EFFECTS_PLUGIN is turned ON in Installing Choreonoid. However, if already built, you need to delete the plugin file after changing this setting. For plugin files, see Plugin Files and delete the corresponding “libCnoidSceneEffectsPlugin.so”. Even when not using scene effects, please enable Graphics Environment Setup if possible.
About Remote Operation
The samples introduced in this section operate entirely on Choreonoid running the simulation, including robot operation, which differs from the remote operation configuration introduced in Robot Operation. We’ve chosen a simple, manageable configuration to first help you understand the tasks and simulation overview.
Additionally, for samples with remote operation using ROS, see:
Please refer to that when implementing a remote operation configuration.
Running the AizuSpiderSA Version
Next, we’ll introduce simulation using AGX Dynamics. The actual competition will use this. If you have an AGX Dynamics license and have completed Installing AGX Dynamics, please try this as well.
The AGX-compatible version of the single-arm Aizu Spider model is “AizuSpiderSA”. You can load the corresponding T1 project with the following command:
bin/choreonoid sample/WRS2018/script/T1M-AizuSpiderSA.py
The robot operation method is the same as the simplified version, so please try operating the robot with the gamepad.
In the AGX version, the track parts actually rotate around the wheels while propelling. If you actually try running on rough terrain with this, you’ll find the track behavior is much closer to the real thing.
Running the DoubleArmV7 Version
We’ve also prepared samples for the double-arm construction robot DoubleArmV7 model.
For the simplified and AGX versions, the corresponding Python scripts are:
T1L-DoubleArmV7S.py
T1L-DoubleArmV7A.py
Load and run these in the same manner as before.
For operation methods, see Double-Arm Construction Robot Operation Method.
You’ll notice the robot is considerably larger compared to Aizu Spider. This makes traversing rough terrain easier, but passing through narrow spaces becomes more difficult. However, obstacles are adjusted according to robot size. For details, see Competition Rules.
Running the WAREC-1 Version
The sample for the WAREC-1 model is:
T1M-WAREC1.py
We haven’t prepared a sample controller for this model yet.
While AizuSpider and DoubleArmV7 can move by simply giving commands to the tracks, WAREC requires integrated control of its legs for walking motions, making even basic movement require a complex controller. For these reasons, we haven’t been able to provide a sample controller at present. Please understand.
Since no controller is configured, when you start simulation with this sample, the robot collapses due to gravity.
Due to this situation with WAREC-1, we’ve only prepared the T1 task sample.
Note that unlike Aizu Spider and DoubleArmV7, WAREC-1 doesn’t have simplified and AGX versions. The sample loads both AIST Simulator and AGX Simulator, and simulation is possible with either. If AGX Dynamics is installed, AGX Simulator is selected by default.
Running the Multicopter Version
As a multicopter sample, we’ve prepared a simulation project using the quadcopter model:
T1L-Quadcopter.py
In this project too, you can operate the aircraft with a gamepad. The controller uses the one from Sample project in Multicopter Plugin, so refer to that explanation for operation methods.
About Tasks T2-T6
We’ve also prepared sample projects for tasks T2 onward. Load and run projects in the same manner as T1. Basically, just replace the “T1L” or “T1M” part of T1 projects with any of T2-T6. (L and M are separated only for T1; T2 onward has a single file per task.)
Note that some tasks don’t have the same configurations as T1. Please understand this in advance.
Task T2
T2 is the vehicle investigation task.
Below shows T2-AizuSpiderSA.py loaded and simulation running:
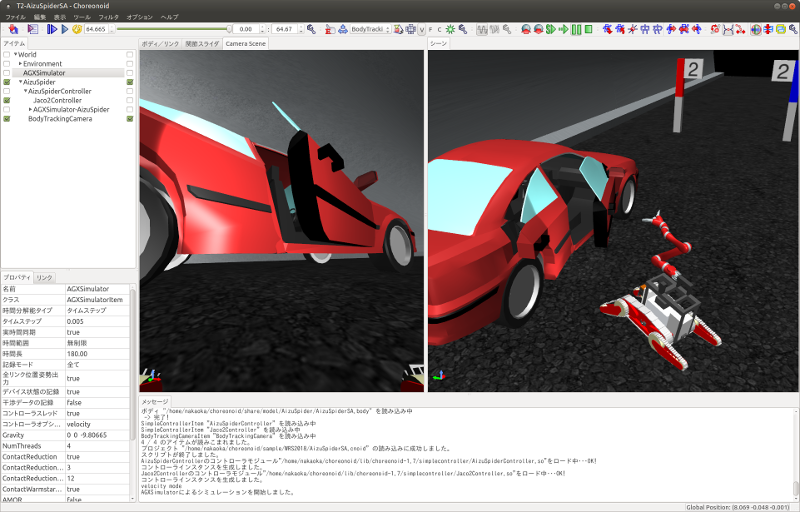
In T2, there’s a vehicle in the tunnel like this. Open this door and investigate inside the vehicle.
Open the door by grasping and pulling the door handle. The sample shows the door slightly open. In the actual competition, it will start completely closed. Note that with AIST Simulator, the door hinge moves beyond its movable range, but please understand. It works correctly with AGX Simulator.
In the actual competition, multiple “target markers” to be investigated will be placed inside the vehicle.
“Target markers” are cylindrical objects as shown below:
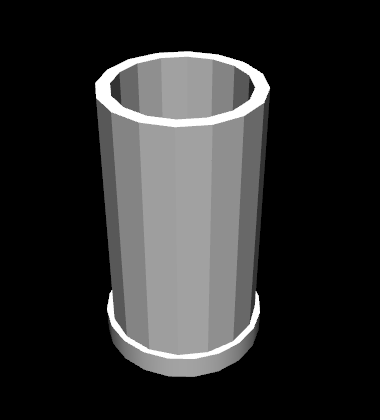
Inside this cylinder is a “QR code”:

The task is to find target markers, capture the inside with a camera, and decode the QR code.
While such actions wouldn’t be performed in actual disasters, the competition uses such markers to judge whether inspection inside the vehicle was completed.
Task T3
Task T3 involves tool-assisted vehicle investigation and rescue from vehicles.
Below shows the screen during task execution with DoubleArmV7 after loading T3-DoubleArmV7A.py:
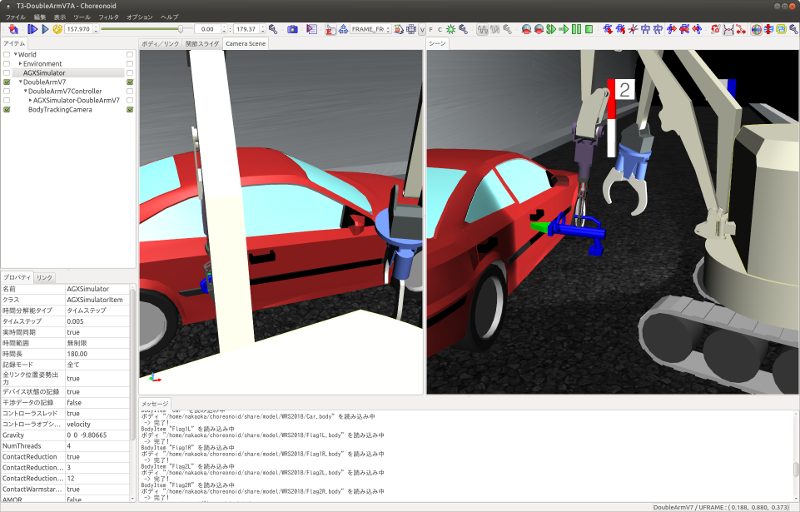
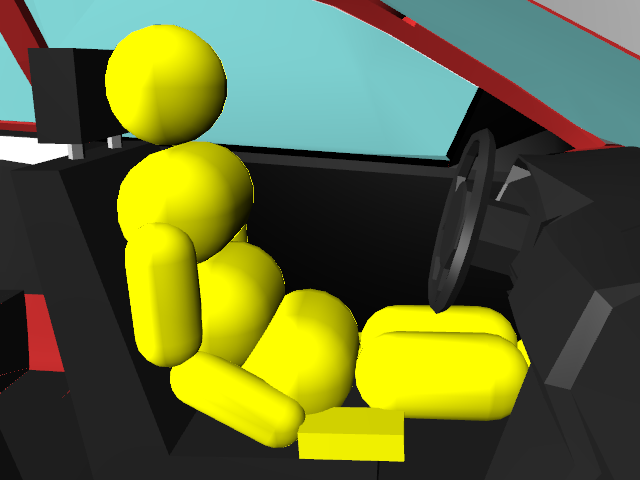
While seemingly similar to T2, a person requiring rescue (dummy target) is trapped inside the vehicle. The door cannot be opened by normal operation. A hydraulic spreader is placed in the tunnel, so you can remove the door by operating it and pressing against the door lock or hinge. (However, this simulation requires AGX Dynamics.) After removing the door, move it out of the way and extract the dummy target from inside the vehicle.
The dummy target is modeled as shown below, sitting limply in the driver’s seat:
Task T4
T4 is a route-clearing task. Below shows the screen after loading and running T4-DoubleArmV7A.py:
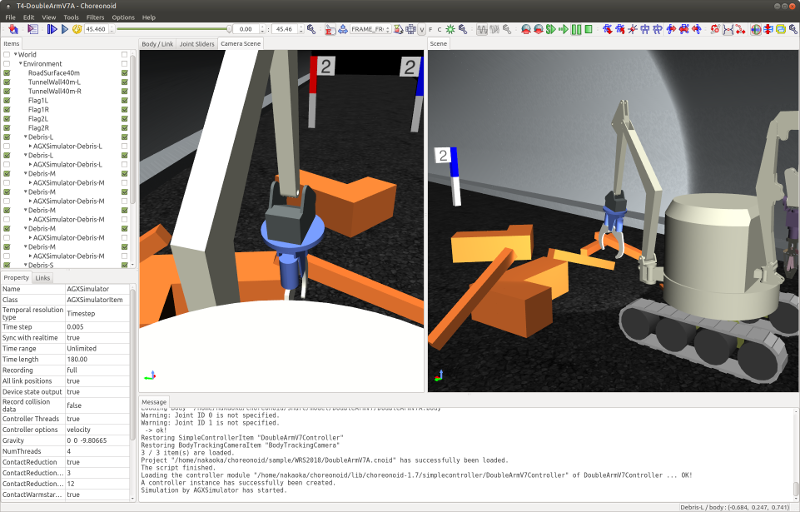
In the sample, several obstacles are scattered in the tunnel, so operate the robot to push or lift them to remove these obstacles.
Task T5
T5 is a firefighting task. Below shows the screen after loading and running T5-AizuSpiderSA.py:
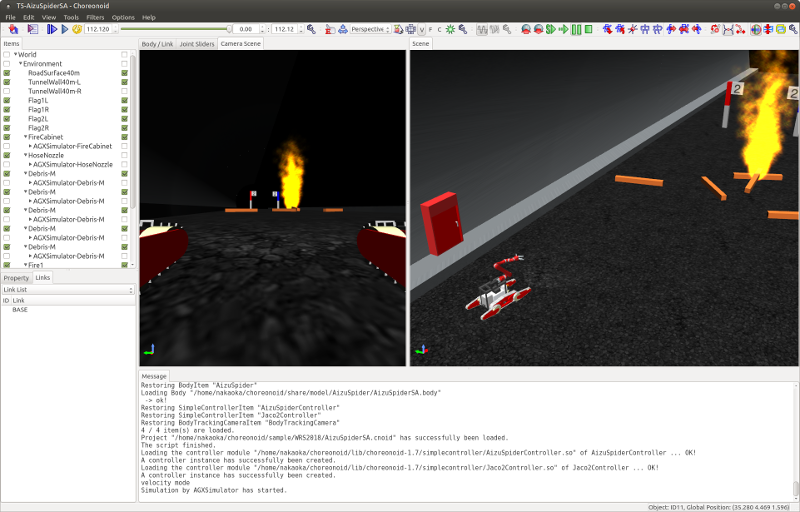
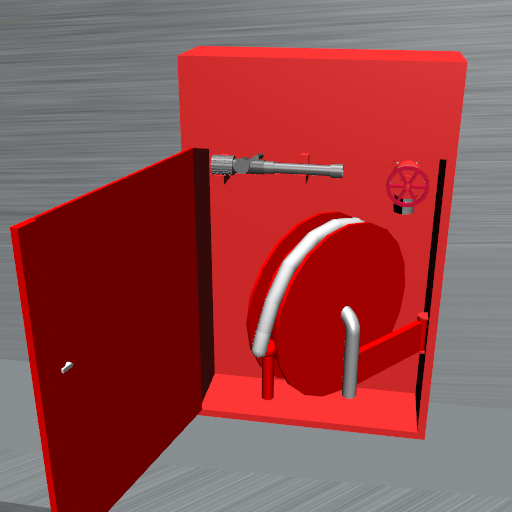
A fire hydrant is installed in the tunnel. Opening the fire hydrant door reveals a hose reel, nozzle, and valve stored inside.
Grasping and pulling the hose end allows you to pull out the hose. First try this operation. However, note that hose simulation also requires AGX Dynamics.
For the task, pull out the hose, connect the end to the nozzle, turn the valve, and pull the nozzle lever to release water from the nozzle.
Once water flows, direct it at the area where the fire is occurring. If aimed well, the flames will diminish. The task is complete when you fully extinguish the fire and pass through the goal gate.
Task T6
T6 is a shoring and breaching task. Below shows the screen after loading and running T6-DoubleArmV7A.py:

In this task, collapsed wall surfaces (plate-like objects) are piled on top of a vehicle. First, for shoring, insert wooden supports under the designated wall surface to stabilize it. Next, for breaching, drill holes from above into the wall surface. Once holes are opened, investigate inside the vehicle by inserting a camera through them. The target vehicle has open windows, so insert the camera through them to investigate. The investigation method is the same as T2, reading QR codes on target markers.
Note that drilling holes also requires AGX Dynamics.