BodySyncCamera
The BodySyncCamera is a camera that moves in synchronization with the motion of a body model such as a robot. When this camera is selected for rendering in the scene view, the camera moves together with the body model so that the relative positional relationship with the body is maintained. This is an extension of the Camera Item, which has the function of synchronizing with a body model in addition to the functions of the camera item.
This mechanism allows the BodySyncCamera to be used mainly in the following two ways.
Camera tracking the robot
When the viewpoint is placed at a position looking at the robot from the outside, such as behind or diagonally above the robot, the camera tracks and films the moving robot. Even when the robot moves, you can keep observing its motion in the scene view without losing sight of it.
Camera mounted on the robot
When the viewpoint is placed at a certain part of the robot body, the camera provides a viewpoint looking out from the robot, as if a camera were mounted there.
The operating principle of the camera is the same for both of these usages; they differ only in the placement of the viewpoint and the settings. (However, when “Parallel tracking” described later is enabled, the attitude (orientation) of the camera is no longer synchronized, so in that case the camera is rather for the tracking usage.)
This camera is particularly useful when combined with the simulation functions described later in the Simulation Function chapter. When a robot moves in a simulation, this camera allows you to observe the motion without losing sight of the robot, or to view images from the robot’s viewpoint. Note however that what is synchronized is the change in the position of the body model itself, so the camera can be used in the same way not only with simulations but also when the position of the body changes by the pose editing operations described in this chapter, the playback of motions with the time bar, and so on.
This section explains how to use this camera. You can read through it even if you are not familiar with the simulation functions yet.
Creating a BodySyncCamera Item
The BodySyncCamera is introduced into a project as a “BodySyncCamera item”. Select “File” - “New” - “BodySyncCamera” from the main menu to create the item, and place it as a child item of the body item you want to synchronize the camera with. It is advisable to give the item a name that distinguishes it from other cameras. Also, turn on the check of the item.
The following shows the state of the item tree view when a BodySyncCamera is introduced into the sample project “SR1Walk.cnoid”. This project is one of the Sample Projects, in which the biped robot SR1 walks when a simulation is started. (How to run simulations is explained in the Simulation Function chapter.)
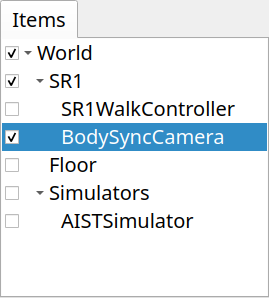
Here the camera is to be synchronized with the motion of the SR1 robot, so the camera item is placed as a child item of the body item of SR1. Note that the camera does not synchronize with the motion of the body unless it is a child item of the target body item.
Selecting the BodySyncCamera
When you turn on the check of the BodySyncCamera item, the camera corresponding to the item appears in the “rendering camera selection combo” of the scene bar, so select it there. For the selection of the camera used in the scene view, refer to Changing Rendering Camera.
The following is an example of the camera selection in the SR1Walk project.
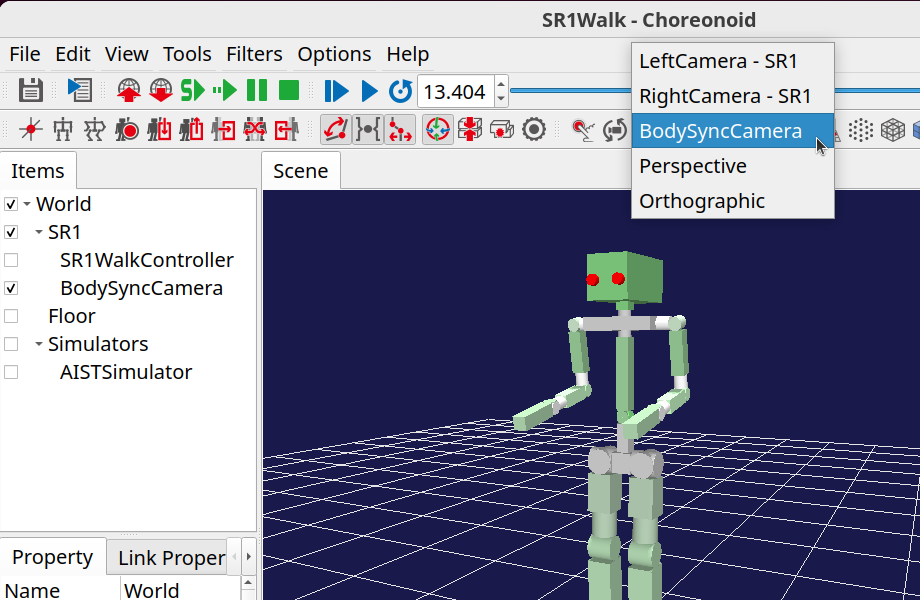
In this state, you can still change the viewpoint with mouse operations, so adjust the camera to a viewpoint that is easy to see.
Camera Synchronization
When the target body moves, the camera moves in conjunction with it. To be precise, the position and attitude of the camera are updated so that the relative positional relationship between the root link of the body and the camera is maintained.
What is synchronized is the change in the position of the body model, regardless of what causes the change. Therefore, you can check the behavior of this camera even before using the simulation functions. For example, try moving the position of the SR1 model in the scene view with the operations described in Changing the Position and Posture. You will see that the camera moves in accordance with the movement of the body and the appearance of the robot in the scene view is maintained. The same applies when the position of the body changes by the playback of motions with the time bar and so on.
As mentioned at the beginning, this camera is most useful when combined with simulations. In the SR1Walk project, the SR1 robot walks when a simulation is started, and if the BodySyncCamera is selected at that time, the camera follows the walking robot and you can keep observing its motion without losing sight of it. Please try it after reading the Simulation Function chapter and learning how to run simulations.
Camera Configuration
When “Camera configuration” is selected in the context menu, the following dialog for configuring the camera is displayed.
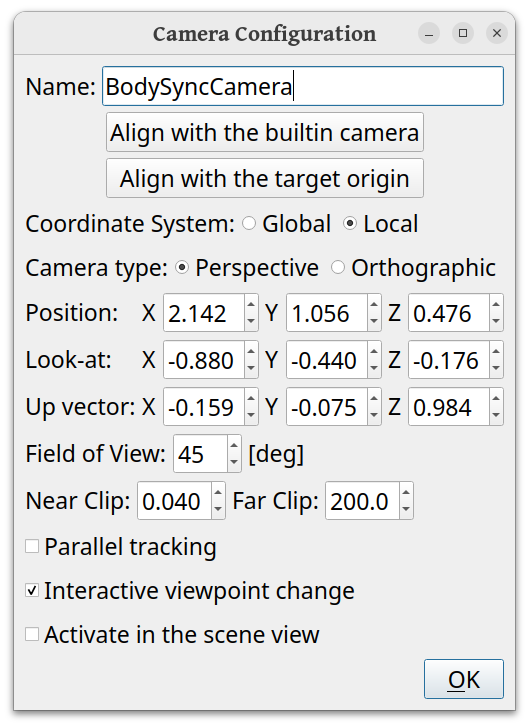
The basic configuration items of this dialog (Name, Align with the builtin camera, Camera type, Position, Look-at, Up vector, Field of View, Near Clip, Far Clip, Interactive viewpoint change, and Activate in the scene view) are common to the configuration dialog of the Camera Item. For the BodySyncCamera, the following items are added to them.
Item |
Meaning |
|---|---|
Align with the target origin |
Pressing this button sets the position of the camera to the origin of the target (the target body/link). |
Coordinate System |
Selects whether the coordinate system of the camera position and attitude set in this dialog is the global coordinate system or the local coordinate system relative to the target. |
Parallel tracking |
When this is checked, only the position of the camera is synchronized with the target, without changing the attitude (orientation) of the camera. |
Properties of the BodySyncCamera Item
When the BodySyncCamera item is selected, the configuration can also be done on the property view. The basic properties such as the camera type and the field of view are common to the Camera Item, and the following properties are added for the BodySyncCamera.
Property |
Meaning |
|---|---|
Target link |
The name of the link to synchronize the camera with. By specifying a link name, a link other than the root link of the target body can be the target of the synchronization. |
Parallel tracking |
When set to true, only the position of the camera is synchronized with the target, without changing the attitude (orientation) of the camera. |
Using the Camera as a Robot-Mounted Camera
As mentioned at the beginning, the BodySyncCamera can also be used as a “robot-mounted camera”, as if a camera were mounted on the robot. The operating principle of the camera is the same as that for the tracking usage; you only have to set the relative positional relationship between the camera and the body to the arrangement of “looking out from a camera mounted on the robot body” instead of “looking at the robot from the outside”.
Specifically, in addition to the usage described so far, make the following settings.
Specify the name of the link on which you want to mount the camera in the “Target link” property. When nothing is specified, the root link is the target. For example, in the case of the SR1 model, specifying the chest link “CHEST” makes the camera synchronize with the motion of the upper body.
Set “Coordinate System” to “Local” in the camera configuration dialog, and set the position, look-at direction, and up vector of the camera as viewed from the target link. It is easier to configure if you first move the camera to the origin of the target link with the “Align with the target origin” button and then adjust the position and other parameters from there.
Keep “Parallel tracking” off (the default). If it is turned on, the attitude of the camera is not synchronized, so the camera does not rotate when the orientation of the robot changes, and the camera does not move like a mounted camera.
If you want to fix the viewpoint from the mounted position, turn off “Interactive viewpoint change”. This prevents the viewpoint from being shifted by mouse operations on the scene view.
When the BodySyncCamera is selected as the rendering camera of the scene view in this state, you can obtain images from the robot’s viewpoint that move in accordance with the motion of the robot.
Note
What is realized here is only a viewpoint for rendering in the scene view, and it is different from the cameras defined as devices in a robot model (vision sensors). How to simulate a camera as a sensor and obtain image data is described in the Vision Sensor Simulation chapter.