Build Method Using CMake and Visual Studio GUI
This section explains how to build Choreonoid on Windows using the CMake and Visual Studio GUI.
Build Configuration with CMake
First, launch CMake from the Start menu or desktop icon. The CMake window will appear as shown below.
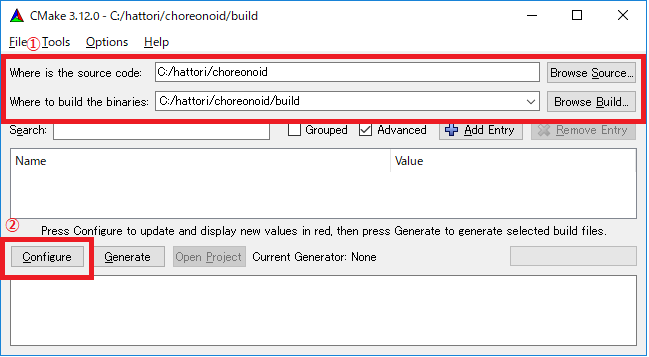
Next, enter the Choreonoid source directory in the input box to the right of where is the source code indicated by red box ① in the figure above. You can also click Browse Source… to open a directory selection dialog and choose from there. Then enter the directory where you want to build Choreonoid in the input box to the right of where is build the binaries. The build directory can be the same as the source code directory, but this can be confusing, so we recommend creating a directory called “build” under the source directory and entering that path. After entering the paths, press “Configure” in red box ②.
If the build directory has not been created beforehand, a confirmation dialog will appear asking whether to create it.
Next, a dialog like the one shown below will open. Select the compiler from the red-boxed pull-down menu.
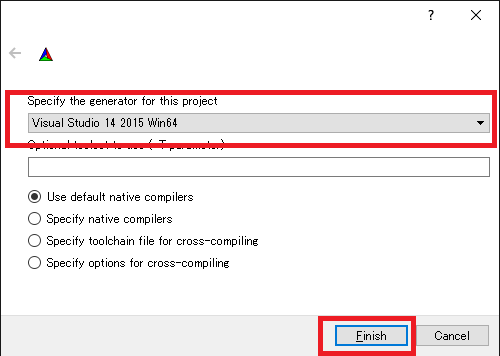
For example, if you want to use Visual C++ 2022, select:
Visual Studio 17 2022 Win64
Below this item is an “Optional platform for generator” option where you can select the architecture. By default, x64 is selected, which is fine to keep.
Once you have made your selection, press the Finish button. CMake Configure will then proceed, detecting compilers, libraries, and other components.
Note
During this process, you may see messages like “The C compiler identification is unknown” or “The CXX compiler identification is unknown”. In this case, the Visual C++ compiler is not being detected correctly. The cause is unclear, but this symptom has occurred in one of the developer’s environments. When this happens, you cannot proceed with the subsequent processes correctly.
For this issue, running CMake with administrator privileges allowed the compiler to be detected and subsequent processes to proceed normally. To do this, right-click on the CMake icon and select “Run as administrator” from the menu. If you encounter this problem, please try this workaround.
Note
If a program called pkg-config.exe is installed in the Windows environment, errors may occur during this process. In such cases, please uninstall pkg-config.exe.
If you selected the default directory for library installation, the libraries will be automatically detected, and Configuring done should appear on the last line as shown below.
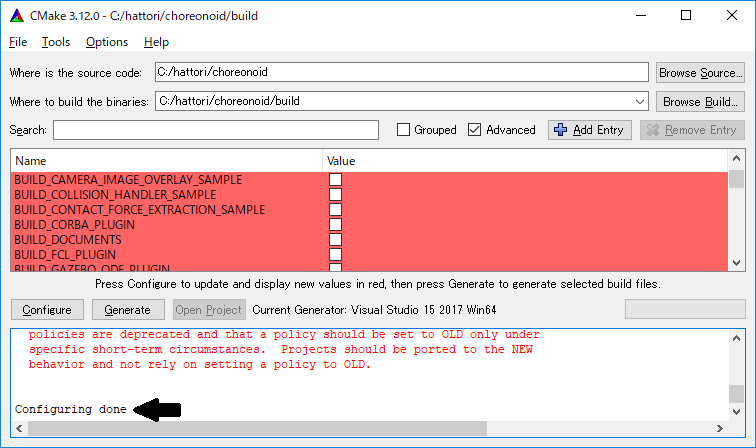
(If you installed to other directories, errors will likely be displayed. Configuration for such cases will be explained later.)
Next, set the installation destination. Scroll the central display as shown in the figure below to display the CMAKE_INSTALL_PREFIX item.
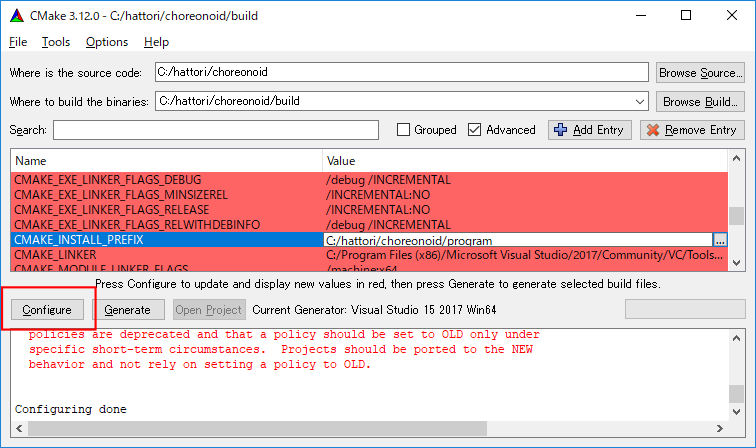
By default, it is set to “c:\Program Files\Choreonoid”. However, in Windows, areas under “c:\Program Files” appear to be inaccessible to non-administrators, so installation may fail. While you can run with administrator privileges and install there, installing to another directory may be easier to handle in some cases. In that case, specify an appropriate directory such as “c:\choreonoid\program” for CMAKE_INSTALL_PREFIX.
After completing the settings, press the Configure button and confirm that Configuring done is displayed again.
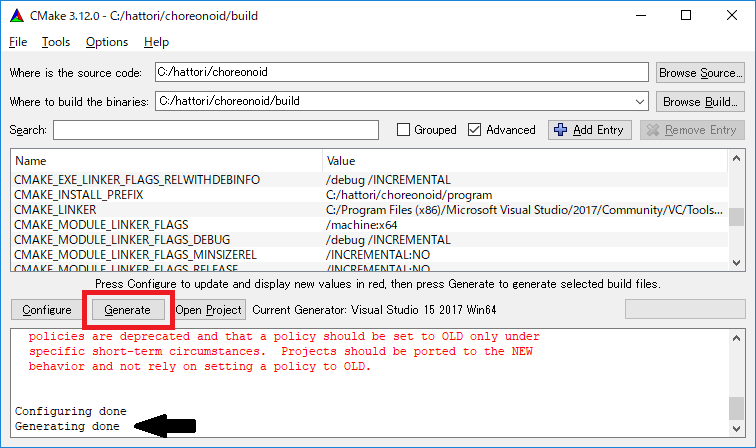
Next, press “Generate” to generate the Visual Studio project files. If the “Generate” button is not enabled, press “Configure” again.
When solution file generation is complete, “Generating done” will be displayed in the message output area.
Next, we will explain the procedures for when error messages appear or when you want to change other settings. If no errors were displayed up to this point, you may proceed to Launching Visual Studio and Loading the Solution and read this section afterward.
If libraries could not be detected automatically, an error dialog like the one shown in the figure will appear.
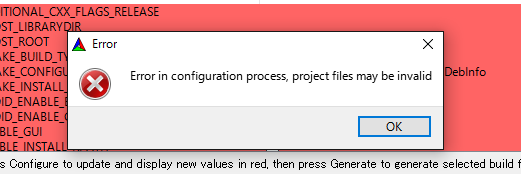
Press OK to close the dialog. Scroll through the message window in the lower section from the top to find where Errors are displayed. Ignore Warnings. Errors displayed lower down may be caused by errors above, so search from the top.
If Qt-related errors are displayed, enter the location where the Qt6CoreConfig.cmake file is saved in Qt6Core_DIR. This file is located in a directory like “Qt installation path/version number/Visual Studio version identifier/lib/cmake/Qt6Core”.
Errors are probably also displayed for other Qt libraries, so enter them in the same way. Warnings can be ignored.
After this, you can set various other build-related options as needed.
For example, some features that Choreonoid provides are turned off by default,
but you can turn on the corresponding BUILD_ options as needed.
Repeat the same settings as above until all necessary library installation paths are identified and no more errors occur.
After completing the necessary settings, press “Generate”.
Note
For other libraries as well, depending on the CMake version, installed library versions, installation locations, etc., they may not be detected and similar errors may occur. Also, errors may occur depending on the option selections explained below. The order in which errors appear also varies depending on the installation situation. In this case, similar to the above, find the error locations and manually enter the installation paths.
Note
The configured content is saved as a file called CMakeCache.txt in the location specified by Where to build the binaries. If you want to start the configuration from scratch, delete this file. It can also be deleted by selecting File - Delete Cache from the CMake menu.
Note
Like Git, recent versions of Visual Studio also allow CMake operations to be performed within the IDE. Those interested in this should refer to the Visual Studio manual.
Launching Visual Studio and Loading the Solution
Next, we will build Choreonoid.
Through the operations so far, the Visual Studio solution file Choreonoid.sln should have been generated in the location specified by where is build the binaries in CMake. Double-click on this file.
Visual Studio should start and the solution file should be opened.
If Visual Studio does not start, there may have been an issue during installation, so try reinstalling Visual Studio or fixing the file associations. Alternatively, you might have success by first starting Visual Studio and then loading the solution file from the Visual Studio menu.
Since the build operations are the same for Visual Studio 2017 and 2019, the following explanation does not specify which version is being used. Therefore, the screen design may differ.
Compilation
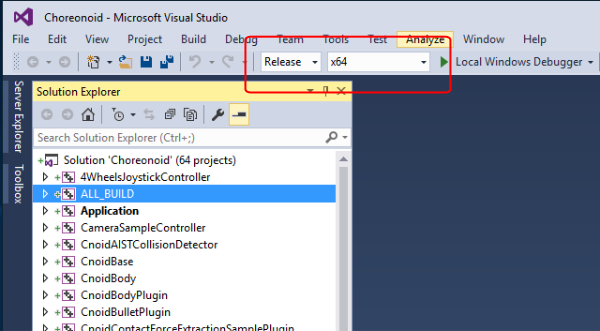
Once the solution has finished loading, you should see a screen like the one shown below. Here, change the red-boxed section to “Release” and confirm that x64 is displayed. Note that selecting “Debug” allows you to generate debuggable binaries. However, these will be significantly slower compared to those compiled with “Release”, so use “Release” compiled binaries except when debugging is necessary.
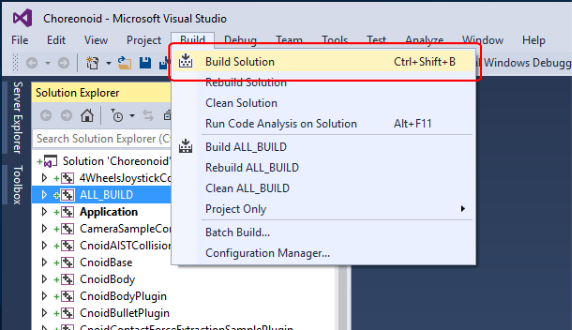
Next, execute the Choreonoid build. Click on the Build menu to display a pull-down menu as shown in the figure below, then select “Build Solution” as indicated by the red box. This will start building Choreonoid. When “0 failed” appears at the end in the message window at the bottom, compilation is complete.
Installation
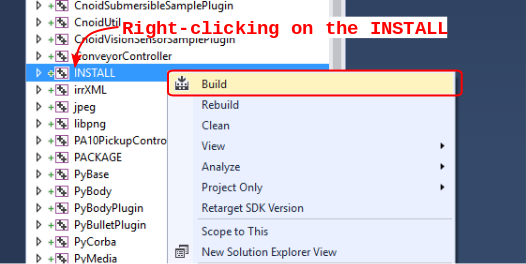
After the Choreonoid build is complete, finally execute the installation. For installation, as shown in the figure below, right-click on the “INSTALL” project section in the “Solution Explorer” in the upper left to display a menu. At the top of this menu is “Build” (the red-boxed section in the figure below), so select it. If it completes normally, the Choreonoid binaries will be copied under the directory specified by CMAKE_INSTALL_PREFIX during CMake configuration. If you checked the INSTALL_DEPENDENCIES item when generating the solution file with CMake, the dependent library binaries will also be copied.
This completes the Choreonoid installation.